S/V Elsa, 1974 Ingrid 38

Let’s all get real clear about one thing: It is Mike who is building the refrigerator system on Galapagos.  In his post on Reefer Madness Mike consistently used the prounoun ‘we’ to refer to all the work being done on our boat. In Mike’s case, he doesn’t generally refer to himself in the plural form as though he were royalty. Mike is not known to say things like ‘Take us to the royal bed as we are tired.’, or ‘We disagree with the lowering of taxes on the masses as we love our money.’.  No, he may speak the ‘Queen’s English’ as a rule, but he doesn’t generally speak as though he WERE the Queen.  Or King. Or whatever.

Mike aboard S/V Elsa took this shot of us as we passed each other out on the bay.

Mike aboard S/V Elsa took this shot of us as we passed each other out on the bay.

So I can only assume that his use of the collective term is meant to somehow imbue me with a sense of having participated more than I actually have. Or perhaps he is using the term the same way people do when the woman has given birth. You know, as in ‘WE had a baby’. Well, NO, ‘WE’ did not. The woman had the baby and you, pathetic man, stood by and watched with helpless awe and wonder. You got to be there for the fun part before, and the fun part after, but the actual growing and birthing of the child? Not so much. And don’t you forget it!

So let’s get real clear about the fact that it is Mike’s job to build this baby. My job is to stand by and watch with pathetic awe and wonder, my jaw usually on the floor. My how our roles have reversed in the last 30 years.

I got this photo of S/V Elsa on a beautiful winter sailing day in February. Could there BE a more perfect name for this boat?

Mike is burning the candle at both ends lately and I am waiting for the crash and burn. He hasn’t set a pace for himself like this since 1992 when we tore the roof off our second house to add another floor on the same day I went into labor with Andrew. If it were not for me, he would be working himself into a lather, and not the good kind. When he started becoming sleepless due to constant perseverating over the fridge project,  I knew I had to intervene and I would need some new blood in order to get his attention. I decided ‘we’ would take a break and have dinner with some new friends of ours and then go and view their beautiful boat, an Ingrid 38 named Elsa. There is nothing like new friends and their boat to get a guy’s attention, especially when the two guys have so much in common, not the least of which is their mutual first name. (Hint: MacGyver.)

If blogs are good for anything it is meeting other like-minded people. We have met a number of great folks through our blog, most of whom live nowhere near us. S/V Elsa’s people, Michael and Kristin, live in Kirkland and keep their boat in Tacoma at Hylebos Marina, where we used to haul out Moonrise, our old Cal 34. Kristin contacted us through our blog late last year and we arranged dinner together. It was great to see them again this year, hear about their new precious grand baby, and finally swap boat viewings.

Bronze samson posts. 100% saucy.

Elsa is a 1974 Ingrid 38 and Michael and Kristin are the third owners. They bought her from someone who had loved her well, started a lot of projects, then had to sell before seeing them completed. Fortunately for them, he left the boat full of brand new parts and pieces of beautiful wood to finish the old girl.  Michael and Kristin, like all old-boat owners who love their vessels, have found a project to fill their hearts and their days as they finish what the previous owner started. Michael’s goal with Elsa is to have a vessel with simple systems that sails beautifully, staying as true to the classic ways of this lovely boat as possible. Apparently owning a boat like Elsa has been a lifelong dream of Michael’s. He’s living the dream!

The previous owner made this block himself. He left a box of them on the boat.

Stepping aboard Elsa you can feel her solid structure under your feet. She rides in the slip gracefully, no jerky movements to put you off balance and plenty of room to move around. In fact, the Ingrid 38 is designed to be sea-kindly and to sail well in rough seas. Originally designed to be a wooden boat, she has the salty look of a much older sailing vessel.  It’s really so lovely to just be able to ‘step’ aboard a boat rather than climb aboard as you have to do with Galapagos. Different boats, different compromises. At 38 feet, Elsa is just right for a couple who wants to do coastal cruising in this area and she is built for off-shore sailing in mind so they have the perfect ‘go anywhere’ boat for two.

All new opening ports, added by the previous owner. Wow!

Like all ‘new’ boat owners, Michael and Kristin have a number of little projects and plans for their girl, but they are also dedicated to sailing her as much as possible. Between sailings there are plans to paint the deck a different color of tan, change the boot stripe color to a pale grey, and they receive their mainsail with new strong track attached this week. We are envious of that little addition to their sailing system and will be keeping a gimlet eye or two on how that performs for them. I get the impression that it is sailing first, boat work second.

MacGyver at his best.

In the photo above, note how Michael solved the problem of adding winches to his mast without drilling extra holes in the hollow wooden spar. Since the spar is painted, he cannot tell for sure what’s underneath the paint except to know that it is a hollow wooden box, many feet tall. He wanted winches, but not holes. So he had these steel brackets fabricated and mounted the winches onto wood boards. These can be easily removed to make sure moisture is not causing trouble underneath the wood. He also had that bar for the staysail fabricated to allow it to move freely as needed. Sweet.

Elsa’s heart.

Elsa’s Volvo engine is accessed through this hobbit door behind the entry steps. For a 38 foot boat, the engine space is generous and I enjoyed Michael’s description of how he would lay down a tarp and ‘swan dive’ into this space, being careful of the crunchy bits against soft flesh. I believe he may have shed a tear or two when beholding Mike’s engine room aboard Galapagos, but hey, you buy a 47 foot boat and you, too, can have an engine room. We all have our trade offs.

Here’s what made me shed a tear or two myself:

Two guesses what this is.

You’ll never guess what Elsa has on board due to the previous owner’s creatively devious mind. This, my boaty friends, is what amounts to a Japanese sitting tub. Yes, that is not me making this up just to make Mike feel guilty. This is an actual fact. Aboard this Ingrid 38 there is a sitting tub in the head. It’s also a great storage space for life jackets but the point is that if they WANTed to sit in a tub of warm water after a rough sail, they could. And I am dead jealous of that. My tub will be sorely missed when we move aboard Galapagos. I see those little tubs in boats like Spencers and Maple Leafs and it makes me swoon just a little. As I fall to the ground on my knees with desire, I have visions of how I could get me one of those aboard Galapagos. I see this one is built in place rather than fabricated and then installed. Hmmmm. The little grey cells begin computing…

V berth on the Ingrid 38.

While Mike and Michael compared notes on things like electrical systems and such, Kristin and I viewed the V berth with a critical eye. Kristin and I share in common a love of a good comfortable sleeping space on a boat. By ‘comfortable’ I mean one that has headroom, light, and that doesn’t require a herculean effort crawling over a sleeping spouse in the middle of the night when nature calls, as it so inevitably does. (And with more frequency, I might add, as one gets closer to that certain age, whatever that is.)

Kristin and Michael are planning to remodel this area. We will be watching closely. Photo credit to their blog.

So she is looking at a remodel of the salon to make cuddling up easier, and create a space for them to sleep more comfortably. I understand her pain. It seems we both have a certain type of space in mind, and while we agree that we understand sailing and safety systems come first, our desires will not be thwarted forever. Stay tuned for updates to all of that on our mutual blogs.

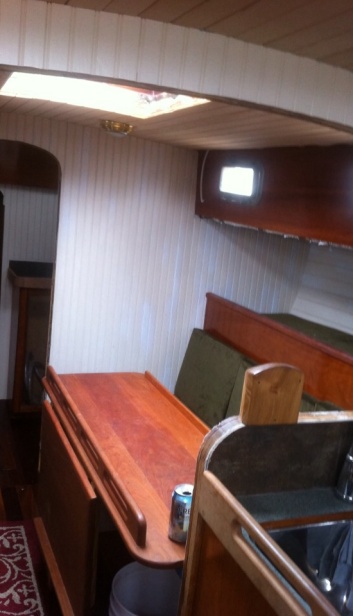
New sinks, countertops, and faucet.

Their galley is adorable and functional. The previous owner put in a new sink and faucet, lined the icebox with nice formica, and resurfaced the countertops. These are all projects that will be happening aboard our boat, too, so I was extra curious about this area. It’s really a lovely space. He maintained the feel of the interior and kept the surfaces easy to clean. Notice the sink is not yet plumbed, but all the stuff is there waiting to be put in place. Here are a couple more shots.

Really nicely done ice box.

Love that easy-clean area on the bulkhead behind the stove.

Notice in the photo above you can see that the previous owner added insulation to the boat, at least above the waterline. Ok, I am dead jealous of that.

For extra coziness on those wet winter days.

Kristin and Michael have a blog you can follow to watch Elsa’s progress as they complete the myriad projects they have in the works. She is already a beautiful vessel and has obviously been well-loved. By the time they are ‘finished’ (HA HA HA) with her, she will be the Queen of Commencement Bay. ‘We’ will be pleased for them.


Reefer Madness part 1

This being Washington and all, you know how we love our reefer.  Whether its Norcold, Cool Blue or Isotherm, we just can’t get enough of that stinky R134A refrigerant and the intoxicating effects of eating food free of mold and salmonella.

DSCN1301

Melissa really exploring the space as we re-insulate our reefer box.

Thus begins a large and critically important project on the long list of large and critically important projects aboard Galapagos.  There was no refrigeration system on the boat when we bought her but it did have a seemingly huge insulated box  (approximately 13 cubic feet).  To our eyes, it seemed very well made and would require only a properly sized refrigeration system to allow us to store all manner frozen foods, cold drinks and fresh vegetables.

The box.  You can see the  lower (freezer ?) door at the bottom

The box. You can see the lower (freezer ?) door at the bottom

If only any boat project were so simple.  A former owner of  Galapagos follows our blog and privately emailed me that the refrigeration system was a constant source of aggravation and expense for him.  He could never get the system to work efficiently.  His suggestion was to gut the entire arrangement and build up a new system.

FullSizeRender (6)

The lower door. While well made, it seems a bit awkward to access.

After looking at various drop in units at the Seattle Boat show, Melissa and I thought perhaps we should buy a nice drawer type unit made by Vitrifrigo. We even drove up to Sure Marine in Seattle to have a look at their systems.

Interestingly when we showed the salesman photos of the existing box, he was impressed and thought it unlikely we could do much better.  He believed a little extra insulation and a good holding plate system would be superior to anything we could buy off the shelf.  That was music to my ears as my vision of a huge freezer/refrigerator was revitalized.  I have mentioned Melissa’s insatiable lust for power in a previous post. A lot of that power goes into keeping food cold and I tend to perseverate on our batteries and their condition.

So now we started in earnest to improve the existing box and install our own cooling unit. At this point, I don’t need to remind you of how much we like doing things ourselves. We never let a little thing like complete ignorance on a subject stop us from forging ahead, making mistakes and figuring this stuff out as we go along.

FullSizeRender (7)

You could climb inside this box.

One of the more highly touted holding plate systems we have looked at is called CoolBlue by Technautics. We have met Rich Boren, The owner, two or three time at the Seattle Boat show, flogging a very efficient holding plate and air cooled compressor.  Every time I’ve met the guy, I came away impressed with him and the product. Reassured by our visit to Sure Marine, I emailed Rich with some photos of our existing box and asked him for advice.

Rich, although busy flying from one boat show to another was quick to reply to our email asking for his opinion on how to proceed.  In short, Rich saw the large size of the box and the freezer door opening at the bottom as being the two biggest problems.  Every time that freezer door was opened, the cold air would spill out and be replaced by warm, moist air.  Besides having to re heat all that air again, the moisture would cause a rapid build up of frost on the plate which would further reduce its efficiency.  His suggestion was to build a new insulated bottom with three or four inches of well sealed  polyisocyanurate insulation and cover it with plastic or fiberglass panels.

So for about a hundred dollars, I bought a sheet of one inch R-Max Insulation, a sheet of FRP panel and a roll of Extreme Temperature Metal Sealing Tape. Along with some adhesive and caulking, I proceeded to create a new, better insulated top loading box. Once committed to the project, my only worry was what the final volume of the box would be.

Cutting the panels.  Use a razor knife to score the back of the panel (the smooth side) and then bend it slowly over an edge. This makes a straight line without a saw and the attendant dust.

Cutting the panels. Use a razor knife to score the back of the panel (the smooth side) and then bend it slowly over an edge. This makes a straight line without a saw and the attendant dust.

Polyisocyanurate insulation has a higher R value than the commonly used extruded polystyrene (R6 vs. R5 per inch) but it does need to be carefully sealed as it will absorb moisture more readily,  The foil tape I used was very heavy duty and has a really tenacious adhesive.  I can see keeping a roll of that aboard for other projects.

Taping any exposed insulation is important.  Check for punctures in the foil backing and cover those too.

Taping any exposed insulation is important. Check for punctures in the foil backing and cover those too.

In order to get some of the larger pieces of insulation through the door, I had to cut one side of the foil and break the insulation in two.  Once inside the box and ready to be glued down I would tape over this exposed insulation.

In order to get some of the larger pieces of insulation through the door, I had to cut one side of the foil and break the insulation in two. Once inside the box and ready to be glued down I would tape over this exposed insulation.

DSCN1294

The back wall of the box has a bit of slope that needed some extra fill. I used the spray foam for this and other small gaps.


Once we had four inches of insulation on the bottom, we went around the entire perimeter with another round of tape.

Once we had four inches of insulation on the bottom, we went around the entire perimeter with another round of tape.

It was nice to see the fresh new panels going in. It makes the whole box look brand new.

It was nice to see the fresh new panels going in. It makes the whole box look brand new.

After laying in the new bottom, I started adding insulation to the sides.  At this point I was starting to count cubic inches. Adding an inch of insulation to the side of the box has the affect of reducing the volulme of the box by another third of a cubic foot.  But I knew that if this system was to work efficiently it would be better to add more insulation.  I ended up adding another inch to the two of the sides of the box and using Reflectix on the other two sides.

I added an additional inch to the sides that would be facing the hull and the in the new freezer section.

I added an additional inch to the sides that would be facing the hull and in the new freezer section.

All glassed in. Just need to caulk the edges.

All glassed in. Just need to caulk the edges.

A high contrast shot of the caulked edges.  In person, you can hardly tell the difference in color.

A high contrast shot of the caulked edges. In person, you can hardly tell the difference in color.

In the end, the box has a volume of about five cubic feet and it looks like a million bucks. The new FRP panels totally transformed the interior of the box.  In addition to this main box, we still have  the lower section with the door.  Hopefully this area will remain cool without robbing too much  energy from the refrigeration system.  We think this area will be like a crisper and at about two cubic feet, it represents a pretty sizeable space.

One result of the extra insulation is that the stock holding plate for the Cool Blue system would be slightly too large. The stock plate is also 2.5 inches thick which I worried would steal more volume.  Fortunately Rich Boren will provide a smaller plate that will just fit.  That will be delivered next week.  Stay tuned for the next episode of Reefer Madness.


Workshop Makeover: Luxury or Necessity?

Owning a large, complicated machine means you need tools, and a place to work on said large, complicated machine.  This is true for a boat, a house or a car.  In case you missed it the last 25 times, Galapagos has a great workshop area; storage and a proper bench with a vice and lots of hammers for wanging on stuff.

The shop before we even owned Galapagos.  A bit messy but full of potential.

The shop before we even owned Galapagos. A bit messy but full of potential.

I won’t lie, I am proud to have a boat with a workshop. It feels like a luxury that I could never have imagined on our boat. But it is a practical luxury, especially if you intend to live and cruise for extended periods.  Both Melissa and I would far rather repair or build something ourselves than to wait for someone to do it for us. If something is broken, at a minimum I want to beat on it with a hammer for a bit just to make sure it stays broken.

So, while the shop is a great resource on Galapagos, there were some fundamental issues that kept the area from being as useful as we would like.  Firstly, the bench top was hinged which opened to reveal what I think was originally a sail locker. Now, all manner of tools, paints, unguents and rags reside in this large, incoherent space.

The workbench raised to reveal the large storage area.  Lots of room but awkward.

The workbench raised to reveal the large storage area. Lots of room but awkward to access.

You can see the problem here.   If  I’ve just torn apart a winch on the bench top and Melissa needs the paint stored beneath, somebody has to wait or clean up their mess. Of late, there is always some project going on and bits and pieces inevitably are left out.  In the photos you can see a cut out in the Fiberglas front that does give some access to the contents below but even that is an issue since stuff just always seems to be creeping out of that hole. Never the stuff you actually need at the moment though.

So, with a year of using this area under our belts, we had some ideas that we hoped would transform the shop into a more practical work area.  I spend a lot of time here and I wanted a space that I would enjoy for years to come.

While we both are pretty skilled at general carpentry, we realized that this project would require a higher level of competence than either of us could muster.  Fortunately, we met Larry Simonds from KnotEtAl.com when we were slipmates and he was working on a Cal 34.  Larry built a great drop down table for our Cal 34, Moonrise at that time, and he has done other small projects over the years. As a sailor and a woodworker, Larry has an appreciation of the vagaries of boat geometry. Together with his discerning eye for color and woodgrain, he is really a fine furniture maker. Fortunately for us, he likes to hang about the docks and can be plied with beer.  Be sure to check out his site for other examples of his work.

Larry Simonds: Chief, cook and bottle washer of Knot Et Al Woodworking.

Larry doing a little boat yoga

Larry doing a little boat yoga

Armed with our ideas and Larry’s skills, we set about to transform the space.  First on the agenda was to build drawers and tip outs into the space. With drawers, we could access items without having to raise the bench top.  The downside to this approach is that we lost some space but the space we do have is much more usable.  Larry made the drawers as long as possible, almost 22 inches to maximize storage. He also blended the stain to match the existing 40 year old coloring of the surrounding wood.  That’s how he rolls.

DSCN1281

Three slideout drawers with catches plus a beautiful Red Elm top. Organizing is still a work in progress.

Since the hull shape greatly restricts the length of the drawers lower down, Larry decided to steal an idea from another drawer on Galapagos and build tip outs for the bottom.  These are used for storing lighter items and I have already dedicated one to rags and nitrile gloves.


Tip out drawers at the bottom provide storage of smaller, lighter items.

Tip out drawers at the bottom provide storage of smaller, lighter items.

For the bench, Larry had a piece of Red Elm which is just beautiful.  In fact, I am a little afraid to use it as it is just too pretty. Melissa put a vinyl covering on the old bench and I think that might be a good idea for this one as well.

Too pretty for a workbench

Too pretty for a workbench

Now that I can move into this new space, some hard decisions are in order.  I knew that I would lose some volume for storage but I minimized that fact. Now I want to have all of the tools plus our great collections of screws, nuts, bolts, washers and other boat bits all in the same area.  It simply isn’t possible and some compromises will have to be made.  Melissa will come down and help me think this through.  She can see things that elude me.

So, luxury, necessity or a little of both?