
Tis the season. Or almost. Our transitional Northwest Weather is upon us once again and you know what that means: Rain. Yes, we all better get ready for winter and the wet it brings.

Snug inside the canvas enclosure.
One of the best things about Galapagos is our dandy cockpit with the nice hard dodger. It really extends the space for outdoor living. When we bought the boat it came with an old but still serviceable canvas enclosure. Someone put down some serious money on this thing and when it was new, I’ll bet it was hell for stout. Over the many years, however, the UV has taken its toll, and it has shrunk up a little, meaning that the panels are about an inch too small on the sides now. Stretching them to fit means they must be wet down, and even then, my hands cannot handle the task. Those snaps are too far apart and it’s already beginning to tear in many places.
We need the enclosure during the winter. It does a great job of keeping the cockpit dry, which will helps us keep wet foul weather gear out of the boat interior. It also helps contain heat. The cockpit becomes like a little sunroom, minus the sun on a normal day in winter. But once the enclosure is set, getting in and out of the cockpit is a PITA. You have to unsnap, squeeze inside then try to re-snap, which isn’t going to happen. We usually just leave the panel corner flapping around. And that doesn’t do much good with rain. Something had to be done.

At anchor in the Gulf Islands. She has the rear part of the enclosure attached.
We kept thinking we’d get a new canvas enclosure, but sheesh! $$$$. Also… Mexico. Are we really going to use this particular kind of enclosure once we are south of the cold and wet? Wouldn’t a more lightweight one be better, preferably with screens? We decided that a new enclosure was not on the ‘need’ list. We can wait until we are down south and then see what we actually need. But what about this winter? I kept looking at that pile of canvas in the storage unit and thinking ‘I could do this myself’. When Mike, looking tired, asked me how much he would need to pay me to NOT take that on, I should have listened rather than feeling challenged. Really, sometimes you’d think he’d know better.
When designing a cheap boat trick, it’s important to keep in mind the goals. In this case the goals were easy: keep the rain out, keep more light in, make it easy to deploy, and do it myself. You’ll notice that one of my usual goals, attractiveness, didn’t make the cut. Good thing, too.
I went to the Canvas Shop in Olympia and took one of the old panels with me. Discussing our needs with the owner there, we decided that since I needed to get only 1 season out of the thing, I could make do with heavy rolled clear plastic and marine grade canvas. This was something my sewing machine and skill level would be able to handle. $83 later I left the shop with ideas forming in my brain.
I would repurpose the attachment system at the top of the panel because that still worked well. It’s a heavy bolt rope that feeds into an aluminum channel on the hard dodger. I would remove the bolt rope from the old panel, preserving the panel as well as possible just in case I needed it later.
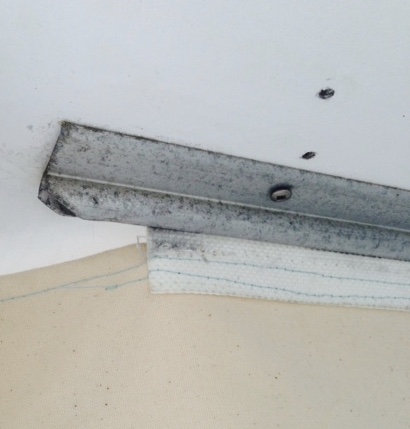
Bolt rope attachment system. Still works great.
This past weekend I decided to dive into the project. It was, in a word, irritating. On the whole it was a dissatisfying project from start to finish, but at the end, I have something that MIGHT last the season. And the goals of being easy to deploy and getting more light into the space are met. My home economics teacher would hang her head in shame at the stitching, but this project pushed my little Brother Runway to its limit.
For all you folks eager to take this project on, here is my hard learning: Hire someone. That plastic is the devil. The needle will go through easily enough, but it would have been made much easier if I had a LARGE workspace where the stuff could lie flat. This is because as the plastic tries to drape over the machine and hang down, it grabs onto everything in sight, keeping it from feeding through the machine smoothly. I was seriously cursing before the first edge was complete.
In addition I’m sure there is some trick of the trade for keeping the canvas edging in position on the plastic while you sew, but since I’m not in the trade I don’t know what it is. Maybe there is something on Youtube. You do the Google, because I’ve decided I’m making only one of these, not two.
Know what else would have made this easier? Hiring someone else. OK, no really, an industrial sewing machine like a Sailrite, with a walking foot. If I were to post this project on the Sewing On Boats Facebook page, I would get a lot of very annoying comments about how I should just buy a Sailrite, all from people who are part of the cult-like following those machines have, and all from people who are not privy to my bank account. Know why I don’t have one? Because I’d rather spend the money on something else. I’m not ready to commit to doing canvas work, even though I seem to be doing just that. If I spend that money on a sewing machine, someone is going to be expected to use it and I’m probably that person. If one fell from the sky, I’d take it, but until that happens, I have many other things to buy that I’m going to use every day, like a new sail track system for that main sail. Some of us have to prioritize.

Finally in place. Just don’t look too closely at the handiwork.
So what will we do about the rest of the cockpit? I will put the old canvas cover up and get it situated somehow, repairing by hand places that are coming apart due to UV exposure. We only need one more season out of the thing, and we will just have to go in and out of the cockpit through the port side. This project, while cheap and tricky, just barely comes in over the finish line as a win. Hey maybe I will get to that peeling teak during our next sun break.

This drain stood way proud of the deck. Water never drained there. It was a problem.
On a more positive note, Mike took out that deck drain that was standing proud of the surface, keeping water from draining correctly on the port side. Whee! I can’t tell you how excited I was to see streams of water disappearing from the deck. I still dislike the design, preferring to have water drain directly overboard through scuppers on the side rather than down into the boat and then out the bottom. Some day we will have those redesigned and those holes in the bottom of the boat filled in. But until then, this is so much better!

Much better!
And as a follow up on this post, we heard from a previous owner of Galapagos who reads our blog and communicates with us about her history and the things he did to improve he. He added that lovely hard dodger and had some words of wisdom for us.
“Looks great !!! Wow what great work. However!!! First of all those side curtains were a godsend at sea when stormy weather or just cold wind made it uncomfortable to be on watch. Spend the money on those to make sure they are the best. As far as screened curtains I had a full set made for the no-Seeums that bugged … Pardon the pun …. Us on the South Pacific and the masses of flys in the sea of Cortez. Did we use them??? No …. dispute being able to kill up to 5 flys with one swat in Mexico we decided that the air flow and light cooling exchange it provided in 100 plus heat was more important than the lack of bugs. Spend the money on weather rain and wind resistant canvas and forget the screen stuff. It should be still on the boat or maybe the previous owners saw the light and sold it or gave it to some unsuspecting cruiser for a cold beer. Those canvas side and rear curtains were the best after two tries and one canvas curtain maker running for his life after me kicking him off the boat and threatening him with close to death if he ever set foot on my boat or considered suing me for lack of payment. The hard dodger was designed by one of Bill Garden’s staff and myself and built to exacting standards by Philbrooks in Sidney to the tune of $32,000 ….later reduced to $20,000 after a bit of angry discussion between us. Enjoy it !! It is solid teak and probably now worth more than the whole boat.
I sure hope I get to see you and all the great things you have done before you head south… I loved that boat more than you will ever know.
Cheers
Derek”
It’s so lovely to be able to get some history from Derek and we, too, have found those side panels to be worth the effort required to use them. We plan to have the whole thing redone in Mexico where we might be able to afford to have it done for much less than it would cost us here.
I know you aren’t going to like what I’m saying here… but… We bought a Sailrite machine… now wait! Listen! And while I will admit that it sits long months without use, taking up space… I was coerced into sewing a new mainsail cover after we bought a new mainsail (our chance to change things)… I can’t believe I did it. I can’t believe it came out as great as it did. AND in doing that one project myself (along with the DIY Lazy Jack system)… we MORE than paid for the cost of the machine and materials. All of the rest of our repairs and projects from here on out will be gravy. You will be surprised how long you will want to use your enclosure even in warm weather. We thought we would be taking our panels down once we reached the Bahamas… but because it rains almost every day, we have left them up. I have made multiple repairs and replaced zippers (blown out in squalls). I have repaired our jib which gave us months of sailing before we had a professional repair (which I could have done myself in hindsight). If you have room for storing a Sailrite and some materials onboard… Spend the money. You will thank me some day.
After I stopped screaming, I did read your comment. LOL! Actually, if we had the extra cash I would love to have one of those machines. But we just cannot spend $1300 on a sewing machine right now, regardless. So it’s just frustrating when people say things like ‘you would have done a better job if you bought a sail rite’, which, of course you didn’t say and I’m grateful for that. And yes, I would want the whole enchilada, not the basic model. There is no way I’m going to take on the cockpit enclosure myself. With our curved cockpit and the angle of attachment, getting around the mizzen mast, etc, it’s too important a project to turn over to an amateur. Too many little bits and pieces that all have to be done correctly. I could see doing a stack pack, and maybe I would take on doing something like that for the mizzen sail. And I could see doing sail repair. It’s possible that if we decide to do a stack pack on the mizzen sail, I could get a sail rite and then do that project myself, partially paying for it that way. But for now, my little Brother Runway is all I’ve got. I figure we’ll hire the cockpit enclosure done in Mexico. I know we will want one but have some design changes in mind. The sides in particular have been really useful up here keeping rain out, even in the summer.
I love the picture of Galapagos at anchor – the blue popping out in the black and white background. Very arty 🙂
The Sailrite koolaid is tasty, but there are plenty of people who get by just fine without one. And they’re so expensive! There are actually plenty of folks on SOB who don’t have them, so you should definitely post over there. And everyone would be interested in seeing your cheap boat trick. We’re all looking for good, cheap boat tricks.
It’s only times like these that I wish I had any kind of industrial machine. My plan is to limit the number of times I need one by turning those projects over to someone else. I see the kool things you make with yours. If I ever find a good old Singer, I might go for that. Maybe.
I’m with you. If we had a Sailrite aboard, I’d be the one expected to use it and that’s not going happen. I do have to admit, though, there’s been a time or two that having a sewing machine would be really handy.
I would like to have an old one with a flywheel that needs no electricity. I know the sail rite has one of those but so do the old school machines. Still, I’m kind of hoping not to do a lot of canvas work. I would, however, like to be able to repair a sail if necessary.
We did our own canvas work and the clear plastic can be a little tricky. We stapled the plastic in place before sewing it with the SailRite.
We have found on projects like this we usually get good at it on the last panel.
Mark and Cindy
sv Cream Puff
Ugh. Indeed. That is probably true. I figure the first panel is the worst, but I’m still relieved to have decided to just do one and let it go. Stapling would have been a good idea, too. I’ll drag the rest of the battered canvas out sometime this week and give it a look. I’m hoping I can just make it work.
To keep things in place while sewing, use a product called Seam Stick. Please note that a much weaker version of this stuff can be had at sewing places like JoAnn’s, but this is the stuff you want. It is especially nice for sewing zippers (use the 1/4″ version).
Just because you don’t have one of their machines is no reason that you can’t take advantage of all the other things that Sailrite sells. If you’re doing this kind of work, you should look there first for what you need. And yes, I am a Sailrite evangelist, if you couldn’t tell…
And as for for sewing the plastic… Get a roll of landscape cloth – this non-woven material will protect the plastic from scratching, and will slide easily on your table. I made a loop of the stuff that went around the table so that as I sewed it was always under the plastic. But much simpler would just be a piece say 3′ x 4′ that you occasionally re-positioned.
This is really good stuff! I knew there must be tricks to this. Thanks for the really useful comment!
Sorry – that link points to the wrong product. Use this one instead – it is designed for the work you were doing…
bob
s/v Eolian
Would have made life a bit easier, for sure.
I made the windshield cover for our last boat. It wasn’t terrible; but it was a lot of work and I had to make a couple “patches” when I miscut the fabric. Only hubby and I knew they were there. Still. We are a little more flush with this boat; so we paid somebody for that this time. And for new canvas and isenglass. Yup, it was a fortune; but I am still sane. I will restitch seams, fix snaps and do the square stuff. I will leave the tough stuff to the experts from now on.
Our canvas attaches to the boat with long stitched “strips” on the sides. Then there are zippers on the panel that zip to these long edges. Then you just unzip to get out of the boat. I rescued a bunch of zippers from an older boat canvas if you want some freebies to try it. I could send you pictures of our set up too if you want to attempt that second panel.
I like the idea of zippers to get in and out. It would be much easier than these dreaded snaps. But I’m not ready to try again just yet! LOL! I will keep your offer in mind, though, and thanks for it!
I SO love your hard dodger!! Since your cover is temporary, would you want to use velcro instead of snaps to get in and out easily? The stick-on stuff might last the winter, and then come off with a little Goo-Gone? You probably don’t need any more suggestions at this point though. (I know everyone has an opinion…)
I do have a sailrite, and I am anxiously awaiting my return to the boat so I can get with the many projects I have planned. I love to sew, and I have been doing it since I as about 7yrs old. I borrowed my sister-in-law’s sailrite and made a fly-bridge cover for a trawler, and charged enough to buy my own machine. Now I have people in Denali Rose’s marina calling me, asking me if I would do this or that. Maybe….. the going rate around here for canvas work is $95.00 an hour. hmmmm, thinking……
I’m impressed with your willingness to take on such big projects. I love to sew as well, and have been sewing since a child. I think that is a thing of the past now. No one really learns to sew anymore. I wish they taught it in school like they used to. It’s such a useful skill to have. You could definitely make some cash if you enjoy that kind of a challenge with the canvas work. I’m not thinking I’m cut out for that. But who knows what the future holds.
Oh, and that drain fitting is a thru-hull that is designed to be recessed into the hull. The hard part about installing one of these is making the tapered recess – I don’t know how you’d do it except for having some kind of giant reamer. Your solution looks great!
bob
s/v Eolian
You are correct about the through hull fitting. I assume it was a field expedient repair that never got addressed after the leak stopped. We would never do such a thing.
The original drains, both on deck and in the cockpit, are eerily similar to hardware used in a bar sink; just a small kitchen drain. Early on, we bought a couple of bar sink drains and they fit almost perfectly. The outer lip is about two millimeters wider than the originals so it doesn’t recess into the deck as nicely, but it is very close and they work well. Melissa remarked after this last repair that we should probably order two more so we have them when needed. Now, if we can only remember where we got them.
My friend and I have been doing canvas work for a few years and have used three different machines. One is a walking-foot sairite machine. It’s OK, but mostly gets used for sail repairs. The next one is an old Pfaff 130 portable machine. As long as you don’t want to use a very heavy thread it works well on most cloth and can do isenglass windows, but is not a walking foot. The machine that gets used most is some bench-mount industrial beast with a walking foot. It is glorious to use it on thick materials. If you’re looking to do more basic sewing for your boat without breaking the bank, consider an old Pfaff or singer. They’re built strong and can sew through more than you’d think. I’ll re-iterate a past comment, sail-rite sells “seam stick” tape which has the double advantage of holding things while you sew and partially water-proofing the seam where you’ve stitched through it. If you do use it on zippers, use the 1/4″ and keep it as far from the teeth as possible or else it will get stuck in there and make your life miserable the first time you try to unzip.
A larger mesh size screen will let more air through, but also no-see-ums. In mild climes screens are worth it on hot days. As for the tropics, I haven’t been so I can’t say.
Hi Brian, and thanks for the informed reply! I grew up sewing on a Pfaff and wish I knew which family member had possession of it. It was a sturdy machine and could do most anything as I recall. I’ve been on the lookout for an old Singer but really I do wonder how much heavy canvas work i will personally do. I can see myself repairing sails but the canvas, well, that’s a level of skill all by itself. I’m going to put in a supply of that seam tape because it sounds downright useful for repairs and I know I have some of those coming up. Thanks for your opinion on this. I appreciate the input.