It seemed that the stars were aligning to finally drop our new Beta Marine engine into Andromeda. I hit Astoria at eight in the morning this past Sunday and found our mechanic, Shawn Thur, tenderly beating the crap out of our propeller while tightening the bolts on his prop puller. Earlier, I had attempted to remove the prop with a large gear puller but succeeded only in bending the bolts on the puller. The prop is in fine condition and will be sent to Sheffield’s for cleaning and conditioning.

Now that’s a prop puller. Shawn is somewhere behind the rudder.
Finally, with the application of some heat, the prop came off the shaft and we proceeded to remove the shaft. Since we had a clear shot in the engine room, it was easy enough to pull the shaft out from inside. The shaft is about seven feet long and was clearly poorly aligned with the transmission. There was a noticeable bow to the shaft.
Warning! Graphic Images of Boat Carnage Follow!
With the prop out of the way, we could now examine the cutless bearing. I wasn’t too surprised that it was worn and that some of the rubber was actually coming away from the bronze tube. Getting the cutless bearing out of what appeared to be a continuous, six foot stern tube proved to be impossible. Our first indication of trouble was when we put a pipe wrench to the tube and the metal crumpled with very slight pressure.

That pink area is the where the zinc has been removed by galvanic corrosion over the decades. The chunks came off with just a light application of torque. This is a classic example of dezincification. That area was where the stainless steel set screw was placed.

Here is a close up of the tube taken with Melissa’s fancy camera. A great example of dezincification for future reference.
With any boat nearing 40 years of age, you have to learn how the boat was built by deduction of the facts before you. At this point, it looked like the stern tube ran continuously from the carrier bearing but, oddly, we could turn the tube exposed outside the boat without seeing the tube turn inside the boat! That meant that a coupling does exist somewhere and we could not see it. Not only that, we could turn the external piece only so far and then it would bind up. Two guys hanging off of a four foot pipe wrench would not budge it. Clearly, we were running out of options. the cutless bearing had to come out. The dezinced stern tube had to come off.

Desperate times call for desperate measures. Shawn thought that cutting off part off the stern tube would allow us to grab and remove the cutlass bearing.
With the end of the stern tube cut off, the cutless bearing still would not budge. Now we were getting into a scary place: cutting into the fiberglass so that we could expose the tube and see what the heck was going on in there. The following photos may not be suitable for young children or owners of old boats.

Shawn makes the first cut into the fiberglass. What mysteries will be revealed?

The first cut into the fiberglass finds that it is indeed all glass. no structural members to worry about. Look at the now exposed cutlass bearing. It seems a little pinkish to me which may mean it has never been replaced.

Now it becomes clear. The cutlass bearing was installed in a bronze nipple that threads onto the sterntube. The whole assembly was then glassed in.
While I am not thrilled with the extra effort and destruction required to remove the bearing and nipple, I am not terribly surprised either. The work to repair this damage will be a few hours and we will fair it as pretty as ever. The glassed area is about 4 inches by 6 inches.

The offending nipple and cutless bearing. Shawn thinks this is a fairly standard piece and should be easy to replace.
From the photo above, it might be hard to detect but this piece has a small taper to it. When we attempted to un-thread this from the stern tube, the thicker part hit the glass hull and then it would bind up.
So, armed with the old shaft, cutlass bearing and bronze nipple, shawn will head to Sheffields Marine Propeller to get parts. Of course, this forestalled the actual installation of the engine. But let us cast a last, longing glance upon this thing of beauty.

It was hard to see this drive away without dropping it into the boat. Note that we opted for the hi-rise exhaust elbow.

I like the easy control panel connector you see below the air filter housing. All engine connections are on the starboard side of the engine.
It is going to be a little awkward to get to the oil and fuel filters on the starboard side. There will be plenty of room around the engine though.

Sheffields fabricated these beautiful new rails for the engine. Sorry for the blinding whiteness of our engine room.
Shawn did drop off the engine rails and since we did not install the engine, I had the opportunity to prime and paint them.
I also received the new control panel and cable. That prompted me to remove the old Control panel and cable. I will have to enlarge the current opening to fit in the new panel so another trip with all of my implements of destruction will be in order.
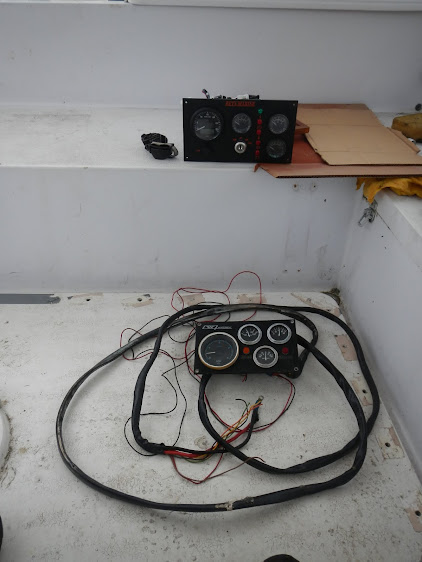
The new panel above with the old panel below.
I anticipate another go this weekend. Shawn isn’t too keen on lugging around the engine in the back of his truck and I would like to have the engine in place so that I can start to place the raw water strainers, fuel filters and control cables. We still haven’t figured out exactly how best to approach dropping the engine into the room but you can be sure I will have photos.
Sorry for the surprise work load but on the positive side, you seem to be making great progress in a short amount of time. Can not wait for the video of when you turn that beautiful new Beta over and it runs perfectly!
As I said to Melissa when I explained the situation to her, I would have been surprised not to be surprised by something.
Shawn said we could pull the raw water impeller and test the engine out of the water which of course now makes perfect sense. It would take some time for the engine to heat up but I think we can at least run it for five or ten minutes to make some basic checks. I’ll be sure to post a bit of video for that.
Ouch!
That’s a lot of work. At least now you’ll know when it was last done and that it was done right. Hope the engine alignment goes well. That is a nice engine too. 😉
Yeah, it hurts to see that scar doesn’t it? Shawn the diesel mechanic took it all in stride and did not seem to think it was too unusual to extricate an old cutless bearing this way.
We have lots of room for the new engine and access to all of the important points along the drive system are pretty good. Shawn indicated that he will align the system to same tolerances he uses on the work and fishing boats. He has also done military vessels so I have great confidence in his abilities.
At least you know the Beta engine is good! At this rate you ill be in the water soon and meeting us in Victoria in August!
Happy New Year Cherry! We are really looking forward to hearing that engine come to life for the first time. I get a little nervous thinking about bringing this boat into Victoria Harbor but I know folks come in on much larger boats all the time. Melissa and I will be spending a lot of time getting comfortable handling this boat.
Are you having fun yet? =) A question though, why not replace the shaft log with a standard setup instead of redoing what was there?
Happy New Year.
Tate,
The wallet is definitely getting a workout. Regarding the shaft log, from what I could tell, the shaft log is glased into into the keel of the boat making its extraction even more horrible than the small nipple containing the cutless bearing. I could be mistaken on this point but we took a pipe wrench to the the thing and it would not turn.
I spoke with the mechanic today and got another fun surprise. He took the prop in to the same shop that has done all the rest of the work and they are saying the prop is rotten as well. I will contact the previous owner and find out what he knows about the age of the prop. From what I could see of the prop, it seemed fine; I certainly did not detect any obvious dezincification as I did on the end of the shaft tube. These guys are all about optimizing the efficiency of the propulsion system from the engine all the way to the prop and so want to sell me a prop that perfectly matches the other attributes of the hull and power-plant. With unlimited funds, I would be all for it but I know a new prop is going to cost us and if the existing prop isn’t terribly out of range for the size of our engine, I would prefer to keep it.
Seems that these projects always expand like that, and should the prop be deemed truly dead you’ll then face the horrible decision that we faced… Fixed blade or Folding. One is so much better for sailing but so much more expensive!
As a side note, it is sort of shocking that the shaft log would route through the actual keel, but nothing really surprises me anymore.
Good luck getting that propulsion setup all sorted out.
I was looking at the variable pitch props as well and I know those things are easily twice the price of a fixed blade. Given the hull shape though, I wonder if we would enjoy much of an advantage in performance with a folding or variable pitch prop. I will check out your posts on the matter.
Regarding the shaft log, I simply don’t have enough experience to know what normal is. I would agree that locating a coupling six inches inside a solid glass keel seems unwise. On the other hand, since the effects of corrosion have affected the small nipple we don’t have to replace the whole stern tube. Perhaps the original stern tube had rotted off the end and they cut the tube to good metal and cut threads onto it. We found records from 1996 where a great deal of work was done on the shaft and cutless bearing some of the notes on the receipt imply that getting the old rear bear off was an issue.
I’ve got a max prop and love it. It’s noticeable if the blades don’t feather. I would recommend a folding or feathering prop. Gori props are not as expensive as some of the others. Best part about mine is a previous owner bought it.
I’ve heard good things about the Max Prop and that the Gori props are not too dear. If I thought I could get two or three years out of this prop, then I might be inclined to put a folder on at a later date. I don’t know how much benefit we would see with a folder on a boat of this size.
I’m still a little woozy from the photo of Shawn making the first cut into the fiberglass. Yes, you warned me but my knees still went weak when I saw the photo.
It was disconcerting true but with that much glass, I doubt we will have any trouble making her good as new.
Will you be able to glass over the scar in this weather? If so how? I really want to do work on the boat but its wet and cold – perhaps big heaters and tarps. The motor looks like a workhorse I cant wait to see it go in. Good luck and Happy New Years.
We will build a small shelter out of some scrap plywood lying around and put a small heater inside. To keep any rain from rolling down on our surgical site, we can tape a bit plastic over the area to form a small gutter. Keeping all the supplies warm until need also works to improve the outcome. Our weather has been cool, not cold of late. Let’s hope it stays that way for a while longer.
Hi-rise exhaust elbow – less chance of flooding the engine. Or at least not a foregone disaster like the other option. Remember, for most vendors the money is in selling engines, not keeping them alive. Esp. if you can pin the blame on a luser error. Say because the exhaust was luser supplied or the safe exhaust design was rejected for monetary reasons.
Safe wet marine exhaust systems can be really simple.
Premise: Always let gravity work for you, never let gravity work against you. [Should gravity fail you’ll have more pressing problems than your ships exhaust. 😉 ]
Rule I: The mixer is below the highest point of the dry exhaust and pointed down. When it fails, and the mixer will fail, it won’t flood the engine. Since the mixer can drain it will fail later. [Check.]
Rule II: The dry exhaust rises above the waterline, 12″ or more, before pointing down into the mixer. This is the highest point of the exhaust system. That way the ocean won’t drain into your ship and your exhaust obeys rule number one in boating: Keep the water outside. [Probably not check.]
And that’s basically it.
Regarding rule II “or more” is one watchword, “above waterline” the other. The more the better, the most the best. 12″ is for stinkers which always run their engine(s) while moving, sailboats may need more and it is more difficult to achieve since the engines is usually installed way below waterline for good reasons.
You are now at the point where you can modify your exhaust system for relatively little money. The best tip I can give you is to make the time to take a close look at the Tony Athens marine exhaust articles. He makes his money by replacing dead engines *and* installing safe exhaust systems. Mostly on stinkers but also on a few sailboats. One of the articles contains his thoughts about the usual sailboat installation, why they s*ck, a lot, and how to improve them.
Well the Hi-Rise elbow was a relatively inexpensive addition to the engine. The elbow will be above the waterline but I know it won’t be any twelve inches above. Like you, I can only see the elbow as part of comprehensive engine protection system. Our diesel mechanic will be designing the exhaust system to minimize the risk of water into the engine.
We have been told that we should not turn on the raw water valve until the engine has started to prevent water from building in the exhaust system with insufficient pressure to move it out of the boat. We are still trying to figure out how to accomplish this without a lot of fuss.
I’ve never seen anyone remove a cutlass that way, usually a Sawzall and a 10 in metal cutting blade will slice thru the cutlass thin shell and you can just slip it out then.
Hummm!
If the bronze nipple still had any integrity, then removing the cutless bearing would have been possible. But when the end of the nipple crumbles when you lay a wrench on it, elegantly extracting the cutless bearing becomes a moot point.
The bronze stern tube was decomposed by galvanic corrosion. Bronze is susceptible to corrosion and will decompose when the sacrificial zincs are not doing their job. This happened to us in the form of the propeller key corroding. We were lucky not to lose the prop. That new shaft that you are installing needs room for a couple of zincs.
The prop shaft had a zinc attached at the very end of the prop (on what was like a crown nut) and it was at about 60 percent of life. There is less than an inch of visible shaft behind the prop but perhaps with the new prop we can squeeze one on back there as well.
With a boat of this age, you just can’t know if there were holidays in the required maintenance for this kind of thing.