Windlass Locker Refit: Epoxy is Your Friend

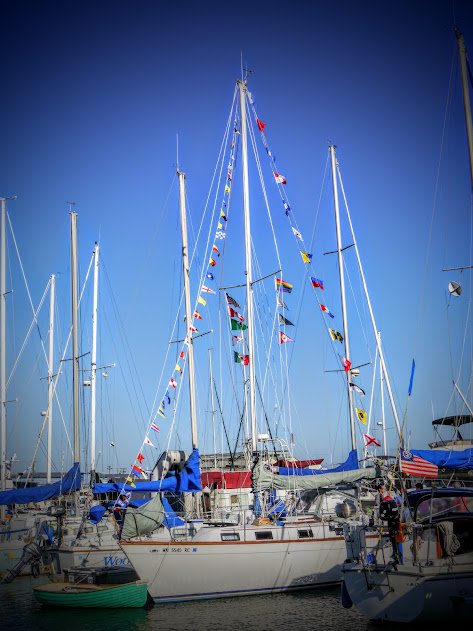
When we bought Galapagos we were kind of enthralled with our Lofrans electric windlass. It’s a love affair that continues to this day and because we love her, we want her to live in a nice place. Long ago we noticed that her locker on the foredeck had seen better days. It looked to me like there was wood rot underneath her foot switches and a couple of times when we pulled up anchor, Mike saw the floor of the locker move a little bit. This gave us pause.

So it came to pass that we decided we better get to it and refurbish that part of the boat. This has been one of those projects that takes much longer than you’d like, simply because there are a lot more parts to it than you think, and because Mike still works for a living. That leaves the weekends. And me.

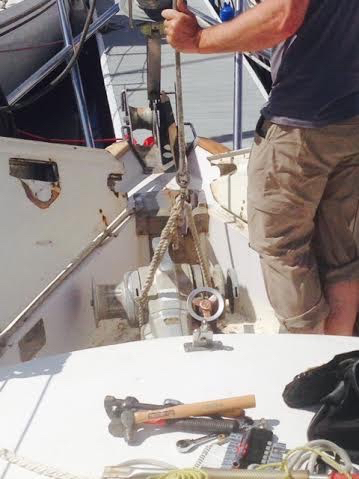
Mike pulled the windlass off and carried her home to take her apart and make sure all of her parts were shiny and new looking and give her a general going over. He can write about that part soon. The windlass has always worked great and we want to keep it that way considering that pulling up anchor by hand on this boat, even given the hand ‘crank’ we can use, would cost a lot in terms of energy, time, and effort. Whatever needs to be done to keep this windlass in good shape is time and money well spent.

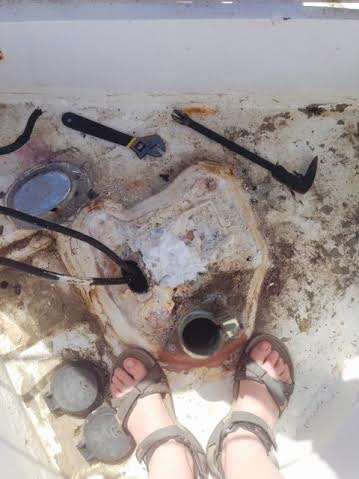
When we examined the wood under the switches it was clear that there was not only rot, but that there was a lot of it. If it were not for the fact that this entire locker is hell for stout, we would have had a bigger job on our hands. The wood in this area is about 10” thick meaning you can have a lot of rot before things start getting serious. That also means that after I removed all the rotted wood, we still had plenty to work with. We decided we did not need to remove the entire floor (thank you, gods of windlass lockers!) and that we could fix the area with a series of epoxies, from the liquid kind that soaks into wood to give it new structure, to the kind you smear on like wood putty.

After drilling holes all over the place to make sure we found all the rot, and a good thing we did, too because water came out of some of the holes, we waited as everything dried out in the hot summer sun. Then, over a week or so we mixed batch after batch of System Three End Rot liquid epoxy and their wood putty version called Sculp Wood. When we ran out of the End Rot stuff, we used the straight System Three liquid resin epoxy. We poured the liquid stuff down into the holes and let it seep into the surrounding wood on the topside. When that was cured, we poured in more. We added fiberglass fibers to thicken the paste and troweled it onto the inside of the locker from below, filling in gaps left by the wood we removed. It was a long process that involved a lot of boat yoga, waiting, and sanding in close quarters.

You may be wondering how rot got involved with this windlass locker in the first place. Two reasons became apparent. Let the first reason be a cautionary tale about being sure you are bedding your screws with butyl tape or the equivalent if they are going to be exposed to water. On our two foot switches, the screws holding one switch onto the wood were bedded with something that protected them from water. The screws on the other side were not. So one side had rusty screws, proving that water was ingressing in that area. The wood around that switch was where the rot started and it spread from there. Of course, it’s probably been 20 years or more since those switches were installed. Let’s keep things in perspective here.

Second, the drainage in this locker was poorly designed in our opinion. I don’t know about you, but I don’t think that drains that are above the level where water stands make sense. Think about it. In your sink, the drain is installed slightly lower than the bottom of the sink. That’s because water runs…..down. Not up. So a drain that stands proud of the surface will never, due to the laws of the physical universe, drain all the water out. Standing water is a bad thing, especially if it is close to electric switches installed with unbedded screws. Voila, rot.

So Mike decided to redesign the drains making them much simpler, and making them drain correctly. You know how when people are married for a long time they start thinking alike? We both came up with the exact same idea independent of each other. When that happens, it’s a go. So instead of reinstalling the drains as they were, he filled in the hole where they would be set, cut off the top of the drain that was too high, then drilled out an area and epoxied the drain directly into the hole. Then he attached the hose. It’s not going anywhere and it drains really well now. Plus with all that epoxy the wood will stay protected long after we’re dead. We are considering this simple solution for some other areas of the boat.

When all the epoxy was cured, he sanded everything smooth on top and on bottom. I followed behind him with two coats of bilgecoat, since this area is protected from UV rays unless the locker is open. Although I didn’t bother with a photo yet, the inside of the locker has a nice smooth ‘ceiling’ now. Our windlass will be much happier in her newly refurbished digs. And we have a locker that will see another 25 years in good shape. Stay tuned for part two, where Mike fills you in on the insides of the windlass. Or something like that.

Aft Cabin Finale

In the history of our ownership of Galapagos, there have been two projects that have felt never-ending. One was the engine exhaust elbow drama, and the other has been the aft cabin remodel. For your reading convenience, clicking on the link takes you to the first post in the series, way back in February, and from there you can link to the next post, etc.

In our last episode of the story of the remodel, we had finally taken possession of the beautiful new mattresses: 8″ of good night’s sleep. My task was to find bedding for that space. If that sounds simple to you, you do not own a boat.

This is where we are starting as we begin this post.

The situation: three separate pieces of mattress in three different shapes and sizes. Two of the pieces are fairly large and heavy. In creating a ‘bedding system’ for this space I had several goals:

  1. It had to be easy to use, and by that I mean that changing the sheets had to require very little ‘boat yoga’, and preferably I would not have to be moving the mattresses around much. I wanted something simple and fast.
  2. The sheets had to fit snugly on the mattresses. I pretty much hate rumpled sheets at home, and I’m not very likely to enjoy them on the boat, either. Two words that describe comfort in the bed are cool and crisp.  It’s going to be hot enough in the tropics without having to mess around with too much sheet fabric that just holds the heat next to you.
  3. It had to look good. When I walk into that aft cabin, I want to look at that bed and be happy. Beauty and function. I want them to play well together.

These are the kinds of design situations that can keep a boat owner up at night, staring at the ceiling, imagining all the possibilities and envisioning the final product. You’ll notice I said nothing about cost in my list of goals. That’s because I already knew, from previous research on the marine bedding industry, that I was absolutely not going to pay someone else to make custom sheets for my bed. You can buy ready-made ‘one size fits all’ cinch sheets for marine berths, but they run about $140 a set for a full size, and that’s on the low end. That’s for one set. I have three different mattresses, not to mention two other cabins. So that would be at least $300 just for two sheet sets. That doesn’t include mattress pads. No. Can. Do.

In the end, I bought two nice mattress pads at Costco, about 35$ each, cut them to fit the top, and bound the edges with extra upholstery fabric. I purchased a set of bamboo sheets at the Canned Food Outlet  for $30 (yeah, who knew? They actually feel like silk. Seriously.), and a second set of cotton sheets at Ross for $20. I cut pieces to fit the top, plus a couple of extra inches, hemmed them and they were good to go. To make duvet covers, I got two sets of microfiber sheets in cheerful patterns for $20 each. I cut them down to size, sewed them up, used plastic snap tape to make closures,  then cut our blankets to fit inside. Done. Nothing too interesting about how to do this stuff, it was just simply cutting and sewing. The total cost for two sets of sheets, pillow cases, and two duvet covers was $160. That’s how I roll.

Not totally happy with the edging on this, but it works fine and at least matches the upholstery.

As an aside, I’m actually thinking these mattress pads are going to be fine for living aboard in the marina this year, but when we go south, they are going to be too hot. I  have some ideas for  quick and easy replacements for these when I find the right deal. But for now, these work great and are very comfortable.

All of this is fairly straight forward. Where the interesting part comes in is in how I hold the sheets onto the mattresses. This research had me drilling down deeply into Google to find sturdy plastic clips that would hold tight, survive the marine environment, and not break under the weight of sleeping bodies, all without causing harm to the fabric. Oh, and they had to look good.

I started with tarp clips, but really they were just too big and bulky. I finally found the clips that saved the day at Hold Up Suspender Company. They sell some sheet straps that looked beefy and, in particular, I liked the clip they had. No one had clips like this place. They are 1 1/2″ wide, and heavy duty.

I put in an order for a set of their sheet holders, which were fairly pricey at 22$ for two straps, plus 6$ shipping. I knew I would need more than two straps for each mattress if I wanted a snug fit that stayed in place. I figured I needed two straps for the middle mattress, and three straps on each of the other mattresses, preferably 4.  If I ordered all 10 straps from the company, that would be over 100$ plus shipping. OK, maybe I should have just ordered them all but at the time, I was into money saving mode on this whole deal.

When the order came, they included an old-school paper catalog and thumbing through it I saw that they sold the clips individually. You can’t find them sold like that on line, only in the catalog. I placed an order for 18 of the clips at $2.75 each. Yes I was kind of in shock at the per/clip price, but sometimes you get what you pay for and these clips are unique.  I figured I would want to keep an extra supply on hand in case some broke in the future or if I needed them for another project. For this project, I used 10 of them, plus the straps from the original order. I have extras to make the straps for the middle piece, and then that will leave 4 extras.

Here’s a warning about this supplier: they have good quality, but I’m not impressed with their ordering. I called to place the order, and when it arrived, it was the wrong item. Completely wrong. They sent me metal clips. Um, can you say ‘rust’ on my new upholstery fabric?  I returned them, and they sent me the right clips in the wrong color. By that time I was just sick of messing around, so I kept the black ones.

I bought heavy 1 1/2″ elastic at Hobby Lobby on sale for 50% off, so that cost me about 8$. In all, the ‘tie down’s’ for this project cost me about 60$ plus change. So I saved maybe 40$ or so making them myself. Not sure that was worth the effort involved, but then I do have some extra clips in case I need them in the future.  They hold the sheet and mattress pad together on the mattress snugly, I don’t have to move the mattress to change the sheets, and I made a little covering for the ones that show so they would match the upholstery. My friend Carolyn over at The Boat Galley did hers sheet holders another way.


Making new sheets when we need them will be dead easy, as there are no seams or corners, just a flat piece, cut to shape and hemmed, that is held on with these clips. One could reasonable ask why  I didn’t go for the usual drawstring approach to the sheets, where you have a giant sheet that covers the entire mattress and is cinched tight with a drawstring. The answer is that these will fit tighter, and be easier to handle. With our mattress shapes and sizes, there would inevitably be a lot of extra fabric floating around the edges with sheets like that.

I didn’t have enough mattress pad material to do the middle section, but when I replace them before we leave, that will be done at the same time, with sheets and straps as well.

Heave a big sigh of relief. We have a cabin with comfy, attractive beds.  Now, do I have the energy to deal with bedding for the v-berth? Maybe I will just wait until we have guests and then figure it out.

Apparently photos are disappearing off the blog overnight and people cannot see the last three. I can’t figure it out yet. So meanwhile I’m posting the photos to our LCP Facebook page. Go HERE to see them. Sorry.


Bearing Witness

Graduations, births, marriages, promotions; these are happy occasions where we invite our community to come together to bear witness. There is power in people holding space for each other as we move through important points in our lives. In the boating community, one such opportunity is the naming of a beloved vessel. Thus we were invited to participate and witness in the highest and best, and most entertaining, way the re-naming of S/V Ella Minnow Pea, owned by friends Trish Harkess and Trevor McInnis down at the Foss Harbor Marina. Soon we will be calling them neighbors!

Ella Minnow Pea is a Cape Dory Intrepid 9 meter sailboat. In spite of her smaller size, I’m always a little envious of Ella because of her underbody. She was built with the same robust features that the original Cape Dory’s are built with, but she has a fin keel, making her more maneuverable than the full-keeled versions. Many is the time I wish Galapagos had more of a fin keel. Alas…compromise.

We were pleased as can be to be invited to the renaming party. It was our first ‘marina community’ event and made us feel that when we move aboard, soon, we will have a ready-made neighborhood of people who welcome us into their fold. It’s something we’ve looked forward to for quite some time and lessens the sting of leaving our comfort zone in suburbia.  The marina community gathered together for food and drink up in the common area before heading down to the dock for the ceremony.

Trish watches as Trevor reads the invocation.

You know, sailing is fraught with superstitions. Or, maybe better stated, opportunities to examine your personal belief systems. We like to practice a little thing called ‘better safe than sorry’ on board Galapagos, so we invoke the protection of our gods and goddesses on a regular basis, and we’ve been known to offer sacrifices, even when virgins are nowhere to be found.

As with many things boaty and religious, there is a tried and true ceremony that is used in the naming or re-naming of a vessel. But it’s kind of, well, just a bit patriarchal. And, you know, traditions change!  I loved the way Trevor re-wrote their ceremony to include homage to goddesses of the sea while keeping the historical tone of the ancient words; bridging the best part of the past with the values of the here and now. The sea is our great mother, as part of our earth. We are connected to her in flesh and in spirit. It is fitting that the goddesses be honored and invoked and to leave them out surely would be asking for trouble. Many cultures invoke the protection of the goddess, in many forms. If you want to use her ceremony in naming your own boat, Trevor would be honored. Be sure to write and tell us about it!

The invocation. Photo credit to Kelly MIlls.

Trish and Trevor did the appropriate thing for their vessel by removing from her all references to previous names.  They waited a year for her and for the gods to settle down before going for the renaming. When we named Galapagos, we removed all references to previous names, and then we did the DE-naming ceremony rather than waiting the full year. When the heart is pure, there are many paths to the goal.

On the day of her renaming, Ella Minnow Pea was dressed in her best flag-waving attire. I’ve never seen her look so saucy. It was as though she knew she was special, that all eyes would be on her as she waited patiently for her baptism. We all carried champagne to the dock to toast to the sea as Trevor took her place on deck and prepared to speak the ancient words. The ritual of the speaking of the words, the connection to our hearts, the purity of the desire, and the witnessing of the community. All were present on a beautiful sunny day. Supplied with horns, celebratory leis, libations, and even a hand drum, the party was ready to usher Ella Minnow Pea safely into the annals of Neptune.

Glasses filled all ’round, Trevor spoke the invocation.  Our toasts, ‘To The Sea!’ , shouted loud and strong, we drank. There was, perhaps, plenty of toasting. Champagne was thrown to the winds, and to the sea, and on the decks of the beautiful Ella Minnow Pea. At last, her baptism complete, her name was unveiled on the stern. And that’s when Trish and Trevor won the marina. Could a name and logo be any cuter than this? Could it be any more appropriate for a boat that is saucy, and sea worthy, and spirited, and can swoop and turn like a kingfisher? I submit it cannot.

Here’s to Ella Minnow Pea. Here’s to Trish and Trevor. Long may you sail together.  Thank you so much for inviting us to be part of your world and for helping us feel a connection of belonging to our new community.

Ceremonies make us wax nostalgic. Want to remember with us the renaming ceremony of Galapagos? We toasted to the winds and the gods of the sea out on the Pacific Ocean, as was appropriate for our plans. It was a memorable day where we learned that you can’t sail north from Oregon. And the goddesses? They are represented by my mermaids, hanging around the boat.