Note: Apologies if the photos are looking weird on your browser. There is a problem with the integration of WordPress and Picasa and I’m working to resolve it.
We dared to say it this weekend. We dared to say we are getting just that close to being able to bring this boat up to Washington. So close that we are actually looking at our calender and beginning to make plans to take leave from work. So close that we’ve created a list of things that must be done before we leave. These are musts, not wants. We must, for example, have a plumbed head on board. We must make sure our safety equipment is up to date. We must call our boat insurance and add the engine to the policy, and be sure we are fully insured for this part of the Pacific Ocean. We must have good ground tackle. It’s exciting to be making that kind of list.
Mike is like the energizer bunny of late. He has so many projects on his ‘to do’ list, rambling around in his head, that I don’t know how he keeps them all straight. He trouble shoots issues during the week, shops for parts, then when we get to Astoria he hits the ground running. This week a new fuel gauge was on his list of projects. Until now, the only way to actually know how much fuel is in the tank was to remove the cover plate and look. That’s too much work. Plus, every time you open the tank you risk exposing the fuel to dust and dirt. So he ordered a fuel gauge and set about to his business. In his mind the most daunting part of the task was making a hole in the aluminum port cover. This little Ryobi drill has more than paid for itself with tasks like this one. 
A little cleanup with the dremel to make the edges smooth, insert gauge into hole, and voila, sort of: 
Next week he will install the visible part of the gauge. It will be next to the engine panel in the cockpit. There is already a hole there, but it’s just that much too big, so a piece of Star Board must be bought to finish it off. Next week that’s on the agenda.
As much as I’d like to sit around reading novels while Mike works his ass off, I, too have projects going on. First on the agenda was finishing up those port screens. Last week I began this project by removing the old screening material and cleaning up the aluminum frames which had old dried adhesive and worn out weather stripping. We won’t need them for awhile, but it will be nice to have them this summer. This week I rummaged around in the attic and found our old window screens from before we put new windows in the house. They had that fabric screen material that I wanted for this project. I cut the screening out with a razor blade and set it aside. Here’s a ‘before photo’. 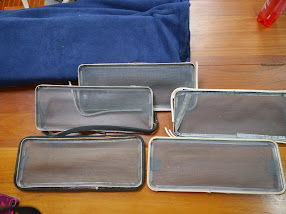
I needed silicone to attach the pieces of screen to the frames, and weather seal to go around the outside to provide a friction fit inside the port holes. This week found us at West Marine for something else, so I looked for the silicone. A small tube for 15$? Um. No. I am way too cheap for that. We went to Home Depot and I found a small tube for 4$, but it looked like I might need two. This was in the glue section. I put them in the cart, then toddled off to find the weather stripping. I found that, and just next to it a large tube of what, in effect, was the same kind of thing. Siliconized caulk. 3$ for a large tube. Just goes to show it pays to look around. Considering that the screen material was, in effect, free, the total cost of this project came in at 11$. I consider that a win.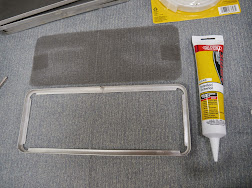
I put a bead of this stuff around the inside edge, then lay the screen on top and pressed into place. Little pieces of screen on each side will help remove the screen from the port easily. This stuff lays on white, but dries clear. After applying the rubber weather seal, they were done.
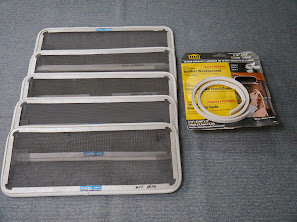
A perfect fit!

Next up was a new fresh water pump. If you recall, our brief ‘shake down’ cruise last weekend presented us with a water pump leaking like a sieve. We had researched which pump to use, noting that the old one was a ShurFlo, but we couldn’t tell which model or even how many GPH it was rated. We went with our Bible of Marine Information, Practical Sailor, to tell us what to get. They had done a review of water pumps in their May 2011 issue. I went to the shelf and pulled that issue and read the article, then we decided to go with the ShurFlo 3.0. The article described this particular pump as being the best one for people who want to take a ‘belt and suspenders’ direction with their choice. That’s us. You’d think we’d want a larger pump considering the size of this boat and the number of faucets. But we don’t want to tax the system by putting too much pressure through it, and we are unlikely to be using more than one faucet at a time.
Down at the boat, Mike decided that the installation of the new pump would be a dandy project for me to take on. He would be working on another small project in the engine room (adding a rubber washer to the brace for the exhaust elbow to dampen vibration) and would be there to coach me and answer questions. He would teach me how to solder. (Be still my heart! Man-cave mysteries about to be solved!) Wide eyed, I asked him if he was serious. Did he really want me to install said pump? I felt the ground shift underneath me just a little as a bit of cognitive dissonance was created. But he looked dead sexy in his new glasses and, well, he believed in me. I mean, what could possibly go wrong?
To be frank, the whole thing was pretty anti-climactic. Unscrew the threaded connections to the hoses, unscrew some other screws, clip some wires. Then use same screws to go in same holes, attach the threaded connectors, strip some wires and wind them together, solder, cover exposed wire and ‘Bob’s your uncle’. The worst part was stripping the wires to prepare for soldering. This was probably the easiest part of the refit yet because it looks like we chose an identical pump. Works like a charm. 
In other project news, I’m in the middle of a temporary re-do of the aft cabin. I ran into such a good deal on fabric that I had to take advantage of it. I am making covers for the berths. I’m pretty tired of having an aft cabin that always looks messy. After working on messy projects all day, we would like a more soothing environment to sleep in. This is what we had to work with:
We’ve been using heavy sleeping bags as sheets, then using our blankets to cover. The sleeping bags were comfortable, but slide around and hang off the side creating a messy space. They are hard to fold and put away in the morning as well and take up a lot of space. Eventually we will do a more serious remodel this cabin but there are more urgent things on the agenda. So meanwhile I wanted something cheap, easy, and hopefully something we could reuse after the remodel. I wanted to create a covering that would act as both a sheet and as upholstery; something that would give the space a bit of a facelift and our raise our spirits as well.
My thought was to go to a thrift shop and get something to recycle but I was not finding anything that was worth the effort there. Instead I went to Hancock Fabric, which was having a huge sale, and found the perfect fabric, in the perfect colors, for 5$ /yard. It was front and center when I entered the store. For less than 50$ I had enough fabric to do the aft cabin. For another 50$ I bought fabric to make slip covers for the settees in
the salon.
. 
In our Cal 34 we used a memory foam mattress topper on top of new foam cushions in the V berth and we found it to be a satisfying and comfortable solution. I wanted to reproduce that comfort in this boat. I had twin size memory foam topper from Andrew’s years in the dorm, and a twin size mattress cover as well. These would do for the small berth. (And as an aside, THIS is why I have trouble getting rid of stuff. I’m always repurposing things.) I cut the mattress pad to fit the irregularly shaped cushion and tacked it into place with needle and thread (you cannot see this in the photo). This will keep the topper in place and provide air circulation between a body at rest and the memory foam. I don’t plan to remove this mattress pad until we replace the whole sleeping unit during the remodel phase. But if I have to, it’s simple enough to snip the threads. 
They I lay the fabric on the berth, cut to shape, pieced it where necessary, fit it using pins, then removed and took it to the sewing machine for finishing. I’m pretty happy with the result and Mike pronounced this berth to be perfectly comfortable. This fabric is definitely a win, and 100% cotton as well. Note that the colors match the pillow cases and blanket that were already on board.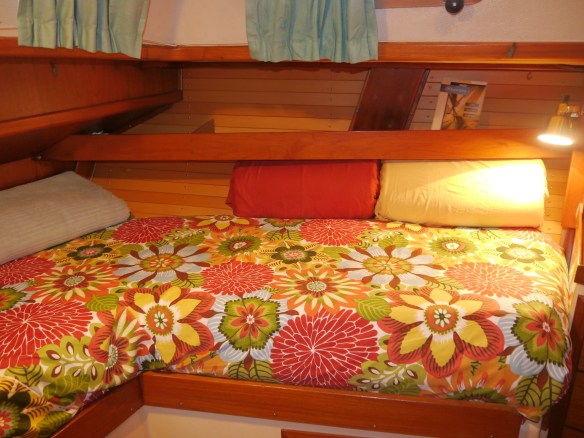
Next is the double berth (a misnomer if I’ve ever heard one). That will be more difficult because I would like to replace the really worn out mattress. At one time it was a good one, but now it’s not. Since we’ll remodel in the future, I don’t want to spend good money on a new mattress or even new foam at this point. Let the scrounging begin.
Our final work of the weekend: Mike installed the mizzen sail before I even got out of bed on Sunday morning. Then we needed to figure out how to use the Lofrans Falkon windlass and take a close look at the anchoring gear. The windlass works great. We’ve never had an electric one before and both have serious trust issues with such things. Therefore we had to be sure we knew how to do it manually. 
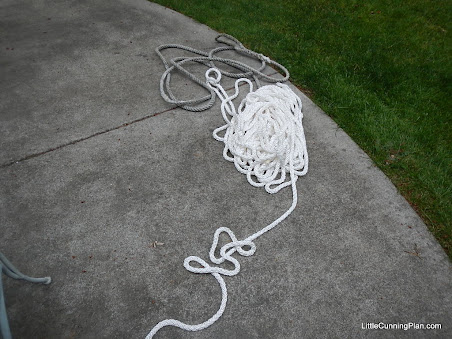
Here’s what we have to work with. This compartment needs cleaning and some minor fiberglass repair, but that’s not on the list of things that must be done before we leave this marina for Washington. This, however, definitely IS on the list:

Would you trust your boat to this chain?
Would you trust your boat to that chain? I think not. The other chain is loads better, but we will be checking each and every link, and we’ll likely replace it before we leave. The latest issue of Practical Sailor came this week. There is a review of anchor chain. Very timely, no?
Finally, we are getting serious about this whole boat naming business. Honestly, it was easier to name our children! I am about to get out the large presentation paper and create venn diagrams, if not spreadsheets. Progress was made, however, when the name of the new engine popped into my head: Hiram. Yes, we have named the engine Hiram after Mike’s Grandfather Boyte, whose nickname was ‘Red’. So there you go. Let it be written, let it be done. Red Boyte lived a long and fruitful life. Let it be so with our engine.

Lady Washington comes a-visiting
Look who visited Astoria this weekend! The Lady Washington.