During the month of April I was so busy writing other kinds of posts, I didn’t have time to update people on the happenings on Galapagos. But that doesn’t mean nothing was getting done. Au contraire, my friendly readers. We’ve accomplished quite a bit.
In the saga of the aft cabin, we made a final decision on what to buy to replace our mismatched, worn out mattresses. As you may recall, we remodeled that cabin just a bit; enough to give us quite a lot of extra sleeping room, with the ability to sleep together, apart, or even athwartship. So many possibiities! That was the easy part. Deciding on a mattress was the difficulty. That decision-making process took me off on a number of tangents in data gathering, but the result is that we’ll have a great mattress, and that all of the cabins have new beds. Nice!
I didn’t want to be ‘cheap’ in buying a mattress, but I also didn’t want to pay about 5000$ for a mattress from the marine mattress place. Sure, it would have been comfortable, but something in me just cannot spend that kind of money when I know good and well I can get it done for less and have a quality product. We have other things to buy. This just goes against my basic values. Also I really wanted latex because it breathes, is mildew resistant, and cooler to sleep on than memory foam. Also.. luxury. Natural latex is not cheap. So I went to work researching.
One thing led to another and before you know it we were also replacing the V-berth cushions because we both just wanted to see how a regular dense foam mattress would feel and those cushions were worn out, too. We went with a high quality 4″ dense foam with a softer layer on top because most of the time this cabin will be used for us to sit and watch TV or for extra privacy. We needed something that would be nice to sleep on, but better to sit on. And we needed to do this first so we could experiment a bit with other foam combinations for the aft cabin.

The ‘before’ photo.
This is going to be an excellent space. We decided that we would not split this mattress into pieces as there is only one storage space underneath, it’s a small one, and we rarely have to get to it. We’ve determined we can lift up the entire thing and prop it up to get to that storage. I will be making pillows to line the hull on the starboard side and Mike is shopping for a small TV screen to hook up to our computers. This is the ‘guest’ berth, and our rumpus room. We are already loving it.

After photo. Color is kind of a spring green with brown flecks. That’s Patrick, from Sponge Bob Square Pants. He makes a good pillow. Also he is a starfish. He lives here now.
Still experimenting, I pulled out the middle berth foam. I decided not to replace that as it was not really worn out. But it did smell a bit like diesel, since it’s right next to the engine room. I brought it home, gave it a good going over with vinegar water and the Little Green Machine, and laid it out in the sunshine for three days. The smell almost was gone.

If you have upholstery, you need one of these.
For the next test, I ordered a soft 3″ natural latex topper from SleepOnLatex and put that on top of the washed foam. This is really nice stuff. It was almost just right, but not quite. I glued those pieces together and covered the whole thing with a special PUL fabric, which is breathable yet waterproof. This is what they make those waterproof mattress pads out of. You’ll find it in the home made diaper department of the fabric store. Yes, apparently people make their own diapers now. Who knew?
I’m wrapping all of our new foam in that stuff before having it upholstered. If the things ever get wet, the foam will not get ruined. And it will not take on the diesel smell we all love, either. Foam is expensive. I’d rather protect it than replace it.

Mid berth cushion already covered with PUL fabric. Yes, I stitched it by hand. Because it’s just easier for me.
Now we were ready to make the decision about the foam for the aft cabin. We work with Best Foam and Fabric in Tacoma. They don’t have a website because they’re old school and don’t need one. These people are really great. They’ve been in business for a long time, are boaters, and know their foam. They are also reasonably priced, easy to work with, and do quality work. They did our v-berth on Moonrise, and I was able to convince them to take on the aft cabin project on Galapagos by bringing in a life-sized pattern of exactly the shape and size I needed. If you want them to do yours, bring a pattern.
Starting with what we knew about how the v-berth felt, we began with 3″ of the same firm base foam and put a piece of our 3″ latex topper on top. We crawled on top of their cutting table to lay on the foam. (It’s not every place that will let you do that.) It was still too firm. Mike is less persnickity about beds, but I want to be cradled yet supported. I want the mother of all mattresses. I want that mattress to offer me the unconditional love and support of a good parent.
We replaced the firm base foam with a medium base foam. Too soft. Not enough support. Back to the firm base foam, we added a 2″ Q21 foam that is softer than the base, but firmer than the latex we bought. Voila! Perfect! With these three layers of foam, we will have a custom mattress that should last for decades. It felt so nice I hardly wanted to get off the cutting table.

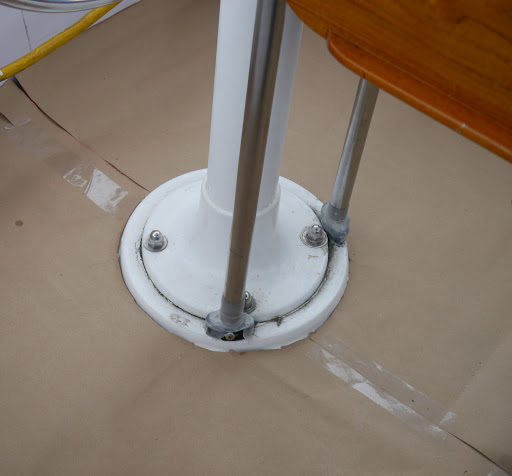
Measuring the curve for the pattern at intervals, 8″ up the hull.
The cost has not been finalized, but it will be in the area of $2,200-$2,500, including the 3″ natural latex that will be the top layer of the foam sandwich, the fabric and upholstering. That’s at least $1000 less than the cheapest bid I got from a mattress shop, and that was a very basic mattress made in Virginia and shipped to me. Who knows how long it would have lasted or how well it would have fit?
To give you an idea of size, I had to order two full size and one twin size mattress topper in order to have enough for the whole thing. I got the fabric on a super special deal at Hancock Fabric (may they rest in peace because I will truly miss that store). Because I was flexible about what I would be happy with, I was able to get all of the fabric for all three cabins for less than $200. I am not including the PUL fabric in that final cost. But it adds less than 100$ to the final price. I am buying that at Hobby Lobby, which appears to have the best, softest product of our local stores, and I’m using their 40% off coupon to buy it.
Next up: the exterior teak. But wait!! Here’s your link to the next episode in the aft cabin remodel.


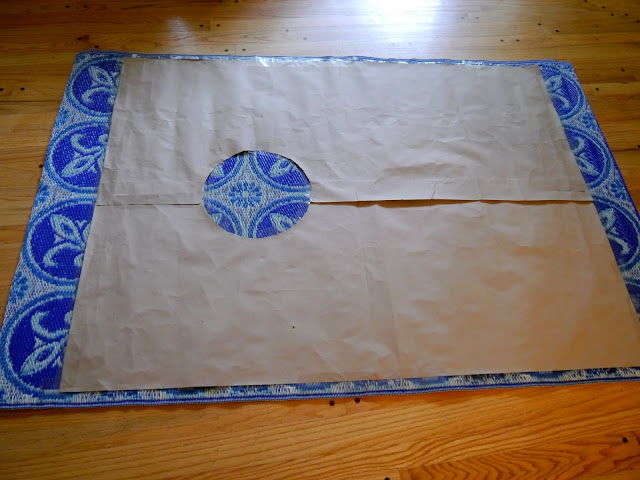
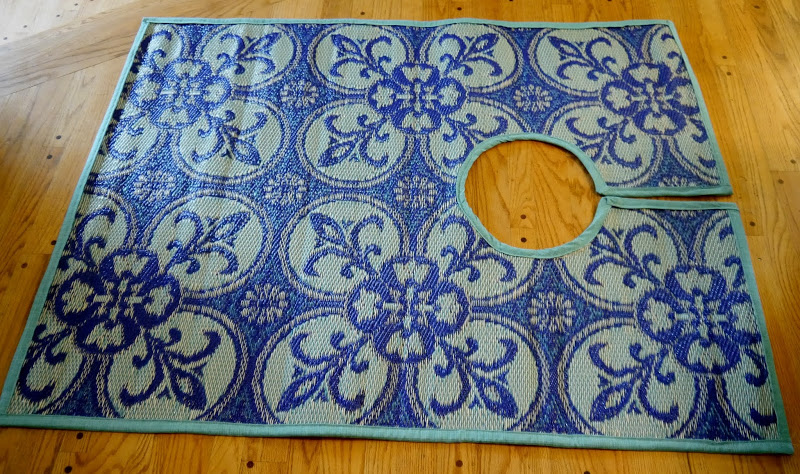
 2. Center the pattern over the mat. It’s easy to do this by folding the pattern in half the long way and marking the middle, then repeating in the other direction. Do the same thing with your mat. Mark the middle on each side, then lay the pattern on top of the mat, making the marks match up. Then trace around the pattern using a sharpie marker.
  3. Now put tape along the edge of the line. The purpose here is to keep the mat from unraveling when you are cutting it, before it is sewn. With this mat, that was only an issue in one direction, but I didn’t know that before I cut, so better safe. Place the tape on the inside of the line. Cut along the tape and get ready to sew. I used sail thread that I already had, but be sure to use outdoor thread. I sewed this on my Brother sewing machine, which is a regular machine. It handled this just fine. Sew along the middle of the tape to secure the edges.