Put the ‘Fun’ in Functional Storage with this Cheap Trick

I was complaining of being bored the other day. We won’t be moving aboard until at least the end of the summer, and we don’t get to have a long cruise this year because of Mike’s work. That pesky annual leave thing is going to be a thing of the past soon enough, so we’re content to wait out the remaining months doing a little bit here and there to move forward with our plan. The house and yard are in maintenance mode, my practice continues to slowly wind down. I’m fine with living in the liminal space, as a rule. But finding myself kind of wandering aimlessly around the house trying to look busy just isn’t my style.  It’s like don’t know what to do with myself. I decided I needed a few small but useful projects for the boat, starting with that cool cockpit mat.cockpitmat

The rumpus room in the v berth is taking shape and we will be using this cabin to watch movies and TV shows we like. To move forward with that plan,  I sorted and stored our DVD collection, throwing out all the colorful plastic containers and storing each DVD in its own plastic sleeve. I then labeled and stored them in nifty snap-locking containers I bought at JoAnn Fabric for 8$ apiece. I know many cruisers store hundreds of movies on thumb drives and maybe that will be in our future. For now, I don’t have the patience for that. This was quick and easy and finding what we want will also be quick and easy.

Our midship cabin got refurbished, too, with the addition of a layer of latex to the foam, and new upholstery.

You’ll be glad to know that the aft cabin project is moving along. We took possession of the finished mattresses this week and I carted them down to the boat to see that they fit before getting them covered. It’s probably overkill, but since I didn’t have any old foam to take in to use as patterns ( I had made my own paper pattern) I just wanted to eyeball the fit before covering. They fit beautifully and allow us to sleep any old which way. The bed is going to be very comfortable and will last for 20 years if we protect them. The next task is to bring them home so I can cover them in that PUL fabric, then take them for their final upholstery. After that, I get to make custom covers and sheets. Won’t that be a creative undertaking! I do believe our goal of having a totally comfortable, sleepable aft cabin is coming to fruition.

So much nicer than what we had before!

The trusty Brother sewing machine has been dusted off and I am rediscovering my love of sewing. As we are now envisioning being able to live with that aft cabin, it was time to turn my thoughts to how we would store our clothing there. We have one hanging locker, a small set of drawers, and a small drawer under each side of the bunk. There are shelves along the hull on each side and I’d like to keep them uncluttered. I would like to keep both clothing and bedding in that cabin and I wanted that storage to be easy to access because otherwise I am tempted to leave my clothes laying around draped decoratively on doorknobs and corners of objects. I know it’s a long shot, but we both really want to keep a neat and tidy look in our boat. It just feels better that way.

Cuteness overload!

Cuteness overload!

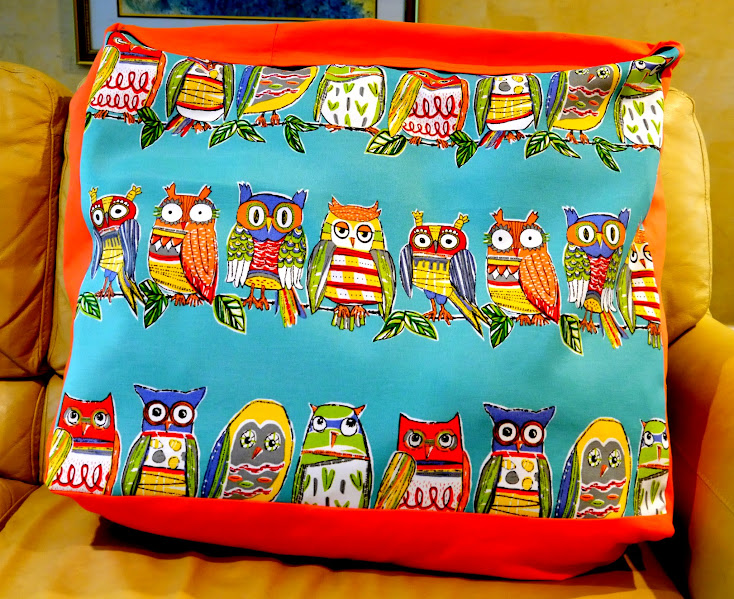
I had been considering colorful soft sided baskets to keep clothing in but where to put them was in question. Instead I opted to make fabric bags that look like pillow shams of different sizes and shapes. I bought 1.5 yards of this super cute owl outdoor fabric on sale for 12$/yard.  Then I found a 3$ remnant of orange fabric that matched. I purchased thread, some velcro, and a set of nylon upholstery zippers.  Total cost for materials was about 40$. For that price, plus some fun time at the sewing machine, I have a selection of sizes of storage containers for soft things like bedding and clothing: 2 large for blankets and such, two standard sized bolsters for shorts, tops, bathing suits, and three additional sizes – 7 storage units in all. These can be stored right in sight on the beds as pillows. The fabric is water repellant and UV protected. Plus…owls! Seriously, you can fit a ton of stuff in these things. Functional, practical, and fun!

The largest bag is 15″ x 26″, for scale purposes.

Mike is working on a couple of interior projects that he will write about soon. Our next joint project will be putting shelving in most, if not all, of the hanging lockers. We have a generous amount of hanging locker space, most of which is completely wasted because we don’t have that many clothes that hang. We already know that this job is going to be a pain in the hind end, so if you have any shortcut tips on how to make it easier, do tell. We want the shelves to take full advantage of all space, so that means they will have have to be custom cut.

This currently holds two blankets and two pillows. It would work great in the forward cabin as an extra pillow for lounging.

Oh, and guess what! We get to go on a short cruise over the Memorial Day weekend. We’ve got friends to stay with Skippy, so Thursday night we are out of here! Yay! We are both so ready for that.

Cheap and Easy Boat Tricks: Fun with Finishes

Mike and I have been taking a small break from the issue of the exhaust system. We will post an update when we get the show back on the road on that issue, but for now, we have lots of other projects to keep us busy. In the ‘cheap and easy’ category, a category I wish included more things, I’ve finished the aft head walls.

Boats need to be easy to clean but in my book that doesn’t mean we can’t have a little fun with the kinds of finishes we use. So when I recently ripped the wall paper off the wall in the aft head (because there was nasty gross disgusting mildew behind it) I decided I would paint those walls in colors that glowed. The walls would be beautiful, and the warm tones would make my skin look better in the mirror. That’s right. It’s all about vanity, people.

The finished product.

Preparation is the better part of valor when it comes to paint finishes. So after ripping the wallpaper off (really it practically FELL off the wall) I scrubbed them with bleach water, then sanded them and primed them with a stain and mildew killing primer. That complete, I was ready for the fun.

Inside the boat there is no need to use expensive ‘marine’ paint. We can get away with using many products that are the same as what we would use in our land based homes. Thus I discovered that at Lowe’s I could buy samples of latex paints, 7 ounces each, that they would custom tint in any color I wanted. The cost? 3$ each. This is a dangerous temptation for a woman who loves color like I do. On the other hand it brought the cost of this cheap boat trick to only about 25$, including paint and supplies. Deal!

This finish involves layering color in a subtle way. The result is a wall that has what I call ‘color texture’. There is an overall impression of color, but when you look closer you see that it’s actually many colors. And instead of a flat look, there is depth to the color that gives the impression of texture on the wall. I love it. This is the kind of project you can do while you have other things going on because there is a lot of time to spend watching paint dry.

Here’s what you will need: latex paints, a clean polishing pad (the kind you use with paste wax or car wax that is basically a round sponge with a fine terrycloth covering), a stiff square tipped artists paintbrush, water, a paper towel, a clear finish like clear polyurethane and your imagination and sense of playfulness.

To do this kind of finish well I suggest you use big, bold colors. Choose colors that are rich and deep. Frankly, I’ve tried this technique with pale colors at home and was less impressed with the results because the pale colors tend to disappear into each other. There is not enough color tint as they are mostly white when you spread them out. Just saying, be bold. Think ‘sumptuous’.

Choose colors that play well together.  I chose my base color, the one that I wanted to dominate the effect. Then I chose 4 other colors that would look good with it. As a rule, stick with either cool or warm tones.  You can do this effect with only 2 or 3 colors but there is a balance here. Too many and your wall will look like mud. Too few and it’s hardly worth the effort. I also like to have enough choices to play with, and at 3$ a pop, it’s not going to break the bank to be generous. paints

Begin by painting your walls with the color you’ve chosen as your base. This will be a strong color and needs to be one of the darker tones in your selection. You will be layering other color on top of it and if you start with a light color you’ll just cover it up. Save your lighter tones for the layering. If you pick a color that is sort of ‘in the middle’ of your chosen field of hues, you can’t go wrong.  I chose to begin with Sweet Mimosa, a color that looked pretty much like ‘tangerine’ on the walls. Even by itself it was lovely. Once your base coat is complete, walk away. Go do another project. Let it dry overnight. You want the walls to be completely dry before layering. 

Go ahead. Just pick up a little color and wipe it on the wall like you’re in kindergarten.

Now the fun begins. Your goal for this part is to pick up very small amounts of another color of paint, using a barely damp (not sopping wet) polishing pad. You might want to practice this part because there is a ‘feel’ to it that you will need to discover. If you use too much water, it will drip down the wall and ruin the finish. If that happens, just wipe it with a sponge and add more color. No worries. You will be spreading the color so thinly that it leaves just a hint of its former self. It’s okay if parts are darker than others. That’s part of the charm. I encourage you to play with it until you get an effect that you like.

Pick up a little bit of color (notice that the applicator pad is almost dry) and then wipe it on the wall with quick, deft motions. Act like you know what you are doing. Pretend you are putting makeup on the wall. You want coverage but it can’t look like it’s caked on or it will be obvious.

This will be blended further.

Do this one color over the entire room until you are satisfied with its transparency, adding a little more here, taking more off there. Step back frequently and view the entire area you are working on to get the overall effect and check for drips.  Use arcing motions with your hand, or crosshatches, or circles. Just play with it until you like it and then stop.

Let this coat dry for several hours. It needs to be completely dry before you add the next layer. In fact, if there are any hard and fast rules for this effect they are to use less water rather than more, and let each layer dry completely before adding another one. Otherwise you will have a muddy mess. You might have to experience that to believe me, so go ahead. You can always paint over it. Here is what the wall looks like after the first layer. 

When this layer is dry, choose another color. Repeat the process. You will notice that when the colors are thinned out like this, they bear little resemblance sometimes to what was in the jar. This is part of the fun. I chose the raspberry colored paint next to add a bit of red to the mix. I wanted the walls to look like a sunset.

These colors are just delicious.

Here’s the wall after adding some of the raspberry and some of the darker mango hue. I was happy with how this looked so I decided that was all the colors I would be using. In all I used 4, including the base color. 

Yes, the differences in the two photos are very subtle. That is deliberate. It is the overall impression of color I wanted, not 4 distinct colors on the wall.  If you are not very sensitive to color variations, this technique will cure you of that.

The final touches are done on the small areas like between cabinets, in corners, and close to the wood trim pieces where the sponge would just make a mess. I use a stiff square artist’s brush. The squared end allows you to get close to the wood trim and make a sharp edge. Don’t use the soft bristled kind. You’ll just frustrate yourself and the cheap ones always lose hairs. You’ll spend all your time picking them off the wet paint. Learn from my experience and just don’t bother.

To do the small areas you’ll use this brush almost dry but there’s a technique to this. The secret is to use the paint lids. Put 2 or 3 drops of water in the lid to thin the paint just a bit. Don’t overdo it. Touch your brush to the thinned paint, then lightly press the edge on the paper towel. You want to let the towel soak up some of the moisture and leave some color behind on the brush. Use a scrubbing motion to rub the color onto the small areas. Again, the brush will be almost dry. You can add one or two drops of water to the brush if you need to. The word ‘drops’ here means exactly that. If you are tempted to use more you will find it runs and ruins your previous work. Again, my experience at work for you. Do not yield to temptation. 

Jiggling and scrubbing the paint onto the detailed areas. A sharp fingernail inside a damp paper towel cleans up those edges.

Here is the wall when all the color has been applied. 

The final touch for this wall is to clear coat it with something that will make cleaning easy and create a hard finish. Always looking for ways to use up what I already have, I checked the big paint cabinet at home and found a can of Spar Urethane, previously used to refinish bedroom floors. Perfect.

This product dries to a hard, satin finish, is water based, and has a slight yellowish cast which works perfectly with these walls. If you need to purchase something for this step, I suggest going to the craft store and buying a small can of the finish of your choice because you will use so little of it. In fact, you use very little of all of the products except the base color. You will have plenty left over to use somewhere else, making this trick even cheaper.

Cheap, easy, and flattering to my skin. This one is a win!


Click on the monkey’s fist to read others bloggers on this topic.

The Monkey's Fist

Cheap and Easy Boat Tricks: Covering Salon Cushions

During our trip I was able to finish my project of covering the salon cushions and we couldn’t be more pleased. When we bought Galapagos the cushions were 1980’s hideous. Really, what must we have been thinking in that decade? They were some kind of mauve and blue misty nebulous looking fabric that made me cringe. In addition they were worn and torn and the foam had seen better days. Brief calculations for replacement ran into the 1000’s of dollars and we were spending that on baby Beta ‘Hiram’ and his personal nursery room, so there wasn’t much left over for what amounted to prettifying the interior.

Skippy is displeased with this upholstery.

Having little money has never stopped me before, so I took it as a challenge and carried on. When one is faced with a task like this, it is important to keep the specific goal in mind; the current goal, not necessarily the long term goal. In this case the goal was to update the interior to make it a pleasure to look at and use until such time as we could afford to replace the settee cushions altogether. In a word, the goal was HAPPINESS. I wanted to look down into the salon and feel happy.  Eventually we will do some minor remodeling in the salon anyhow. So for now, the happiness upgrade had to be enough.

Since the foam was fairly worn, I added a layer of 1″ cheap foam I got at Hobby Lobby. Cheap is the operative word here and it’s good that I didn’t spend much money. I’m not sure I would go that route again. But I cut the foam to add a layer to each bottom cushion and got started. It did add some comfort and that’s what I was going for.

First draft. A revision was definitely in order. This looked sloppy and the fit was too ‘casual’ for me.

Like many projects of this type, I never know how I’m going to do something until I get into it a bit. I started by trying to make easy slipcovers, thinking I would then be able to remove them for washing. After making a couple of these I decided I didn’t like the way they looked and wanted something more fitted. I didn’t care if I could remove it or not, because, again, the focused goal was an upgrade in looks and comfort for the short term. It needs to last a couple of years. I would use Scotchguard to protect the fabric. As usual, I was making it way too hard.

The old upholstery was built like a tank with three separate sections on the settee backs, each containing its own foam and each with its own zipper. It made me tired just to think of how I was going to keep the same tailored look without all the trouble. In addition, I had bought all of this fabric that the store had because I loved it that much, but it still amounted to less than what I believed I would need. I would have to cut corners to extend the fabric somehow.

The solution was so much easier than I suspected. I simply pinned the fabric tightly to the cushions and, by hand, stitched the fabric in place on the cushion, tucking the corners in neatly and stitching them down. I had the fabric positioned, pulled snug, and pinned before stitching so there were a lot of pins.  I used a large running stitch to sew the fabric to the seams in the settee backs, giving them a ‘folk art’ look that goes well with the fabric pattern. These seams were the hardest part. I ended up ordering some cheap upholstery needles from Amazon. The 12 inch needle did the trick and will serve nicely as a spear should we ever find we need one.cushionback

One of the money saving strategies I employed here was that I did not buy zippers or any other kind of sewing accouterments. Only thread and the deadly needle. In addition, since I added a layer of foam to each seat cushion, none of them are reversible,  removing the need to have fabric cover the back. This saved me fabric, time, and labor as I didn’t have to piece fabric to get the entire thing covered.

Here’s the cost breakdown:

Fabric: 20 yards 160$
Foam 40$
Thread 10$
Deadly needle 5$ for a package that included even larger needles.
Total cost: about 215$

Once I got the method down, the work went quickly and easily and I actually enjoyed sitting in the cockpit and stitching away. We’ll call this a win in the cheap boat tricks category. .


Click on the monkey’s fist to read others bloggers on this topic.

The Monkey's Fist